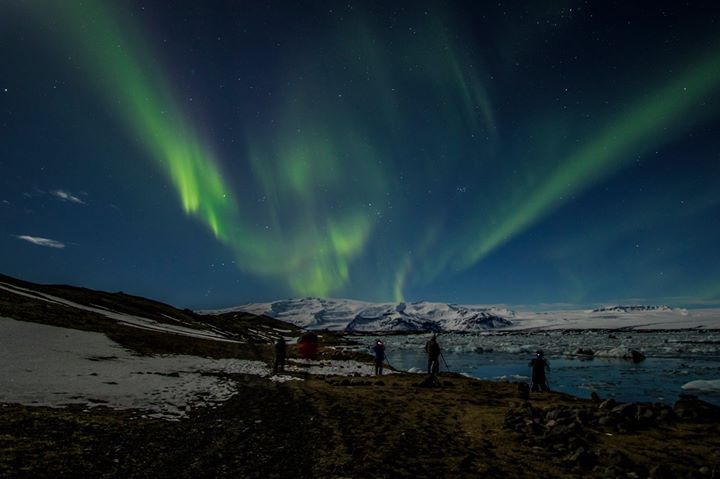
Here are some tips to help you make the most out of any potential opportunities you may have for a sighting of the Aurora. Generally, the Aurora are at their most active during the months of March and October, in Northern Sky.
Viewing Conditions
Occasionally sightings are possible in the UK, you can find out when you are likely to be able to see them by signing up for an alert e-mail from the likes of Aurora watch by Lancaster University, or the British geological survey. In addition, a number of apps are available for Android and iPhone. Weather, obviously a mostly clear sky is required, so keep an eye on the weather forecast via your local news and weather. A night without a full moon high in the sky also helps.
Location Considerations
You need to find a site with a good view of the northern sky, away from any potential source of light pollution and ideally with some foreground interest. (Mountains/Lakes/Trees etc.) It is a good idea to survey the site in daylight for safe access in dark.
Kit Considerations
Clothing, you will need to select warm clothing including a hat and gloves, as it can get very cold waiting around on clear nights. A good torch is essential, especially if your chosen site requires walking some distance from the car. A head torch is a good choice as it leaves your hands free when setting up your kit.
Camera Gear
A DLSR with a Wide Angle lens of 10-20mm. A fast prime (f2.8) lens can be a good choice if you have one. A sturdy tripod with a cable release or remote for your camera is essential as exposure times will be measured in seconds.
It is advisable to have a spare battery for your camera as the cold affects performance. Keep spare batteries in a pocket close to your body to keep them warm. Take care to ensure there is nothing conductive in your pocket that could cause a short circuit, as this could damage the battery and possibly you… It’s worth finding something to protect the battery terminals.
Camera Setup
Autofocus is impossible in the dark and infinity varies throughout the zoom range so if you are using one, it is best to focus during daylight conditions. Set your zoom to 20mm and focus on the distant subject with autofocus. Then switch to manual focus and note the location of the focus ring, you could also tape the ring in position to ensure it doesn't move.
To ensure the stars don’t become blurred sausages, calculate the maximum exposure time using the 500 rule, i.e. take the focal length of the lens (20mm) and for non-full frame cameras multiply by the crop factor (Canon = 1.6) (Nikon / Pentax = 1.5) (Olympus = 2) and divide into 500.
So for a Canon with a 20mm lens the calculation would be 500 / (20 x 1.6) = 15 seconds.
This is maximum exposure time before stars start to blur, try to keep the exposure shorter by increasing the ISO
Taking the Image
Remember to:
- Shoot in RAW format
- Turn off Image stabilisation
- Use mirror lockup with a remote or cable release
- Alternatively use the camera's self-timer
- Try and keep time to 10 secs max by increasing ISO up to a limit where significant noise is a problem
- Blank off eyepiece during exposure to avoid stray light getting into the camera and turn off your torch
- Play with Exposure compensation if necessary
- You may need to take two exposures one to capture the foreground and one for the Aurora. I used my camera’s 2-second timer after pressing the shutter button to reduce any camera movement.
- If at all possible don't try changing the lens in the cold and dark.
- If using an infrared remote keep away from other photographers in case you set their equipment off.
- I found that in the pitch black and freezing cold, it is helpful to minimise bits and pieces that could be dropped or lost.
Remember warm air holds more moisture than cold air so when returning your kit directly to a nice warm vehicle or home, your camera and lens will form condensation. This can be prevented by putting the camera/lens into a sealed plastic bag before going inside, thus trapping some cold dry air in the bag with your kit, allowing it to warm up gradually. (The idea is if any condensation forms it does so on the bag, not the camera/lens)
I know this sounds a lot but if you practice in the daylight, it should be a lot easier in the freezing cold and a pitch black night
Post Processing
After capturing your amazing Aurora Images you may want to tweak them. Here are a few basic suggestions using Lightroom or Adobe camera raw:
White Balance - If a green haze is present try adjusting the temperature slider to between 3500-4500K and tint between +30-70. If your image was moonlit then temp of 4500 & 0 tint.
Adjust Exposure, Highlights and shadows to suit.
If Lights require enhancement use a narrow graduated filter set on the horizon with a reduction in exposure and increase in contrast.
To add clarity & Vibrance to lights adjust sliders to suit.
If your image is still a touch green - Go to the Camera calibration section and give shadows a magenta tint.
You should now have an Image to be proud of. If not, start again and don't fiddle so much!!
Article was written by: Gerry Stephens on 19th, February 2018